This article goes through how to install Kali Linux on VMware Workstation. Kali Linux is a Debian-derived Linux distribution designed for digital forensics and penetration testing. It is maintained and funded by Offensive Security. Kali comes bundled with over 600 tools used for penetration testing.
Running Kali as a VMware virtual machine means you don’t have to do a bare-metal install, and get the advantages that running as a VM offers. Usnig the virtual image is a good alternative to using a live CD. Here we will be covering how to install Kali Linux on VMware Workstation, but many of the steps will be valid for VMware Player and for VMware Fusion which are VMware’s other desktop hypervisors.
Download Kali VMware Image
Installing Kali on VMware is made easy, due to there being an official Kali VMware machine available for download. The Kali VMware image can be found here. The current version which I am using for this tutorial is Kali 2020.4, which is a 2.4 GB download in the form of a .7z file (for which you may need 7-zip to extract the contents).
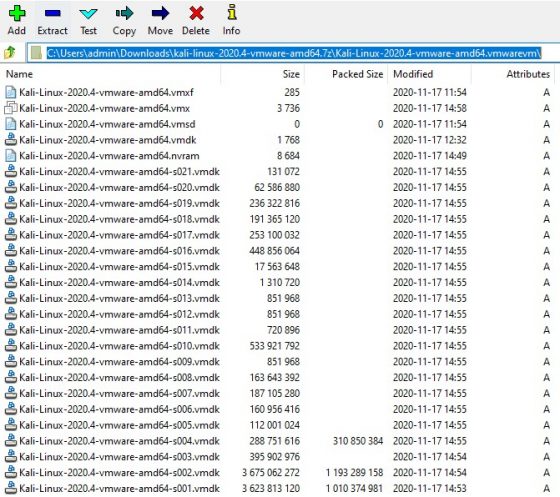
Interestingly, the contents of the download is a set of virtual machine files, rather than the a OVA or OVF file. The contents of the archive I downloaded looks like this:

As you can see, there are a bunch of files in the archive, including the virtual disks (vmdk) and virtual machine configuration (vmx) files. The next step is to extract these files to a suitable location. I have a directory on my system which I use to store all my VMware Workstation VMs, so I created a sub-folder in there and extracted the Kali VMware Virtual Machine files to it.
Importing Kali into VMware Workstation
With the files extracted, we can now open this Kali virtual machine using VMware Workstation. To do so, in VMware Workstation, click the File menu, then click Open. Now, browse to the location where the Kali files where extracted, then select the .vmx file. This is the file we want to open.

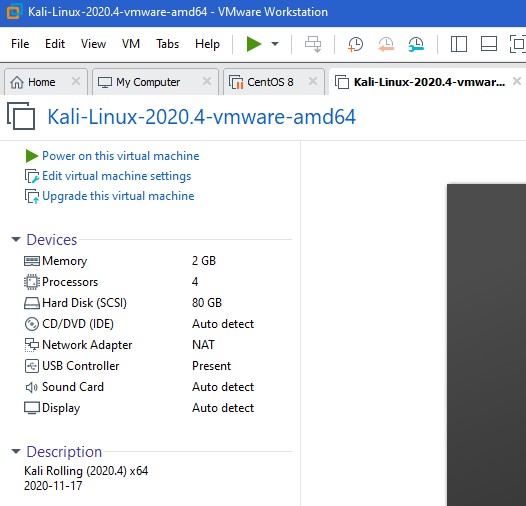
Now you should see the Kali VM in the VMware Workstation console:

At this point, it’s worth checking the devices/resources that have been assigned to the Kali VMware Virtual Machine. We can see that it has been allocated the following:
- 2 GB RAM
- 4 vCPU
- 80GB HDD
- 1 vNIC (NAT)
- USB, Sound and Video devices
Before powering on the Kali virtual machine, you can change these values if needed. For example, you could add more memory or vCPUs depending on your needs, or change the network configuration. The defaults are fine for now though, and you can always power off the virtual machine and change things afterwards.
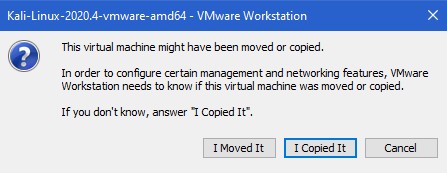
Now, time to hit the Power On button. When powering on the Kali virtual machine for the first time, you will be asked if you have moved the VM or copied it. We can safely answer that we have copied it:

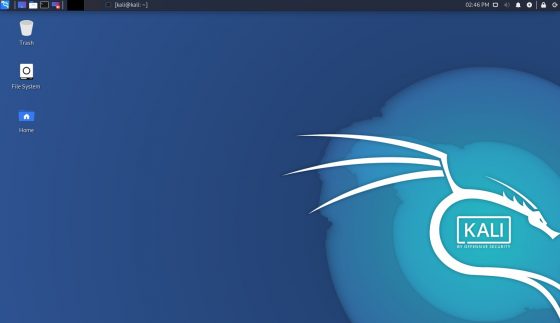
The virtual machine will now boot up, and you will soon be presented with the Kali login screen:

You can now log in using the default credentials (username: kali password: kali):

And that’s it! We now have a working Kali VMware virtual machine using VMware Workstation.
VMware Tools on Kali Linux
Typically when you create a VMware virtual machine you will want to ensure the VMtools package is installed and working correctly. As it happens, we don’t have to do anything with our Kali Linux VMware Install because the Kali VM already comes with Open VMtools installed. We can confirm VMware Tools is running correctly on Kali by opening a terminal window and checking the service using systemctl:
$ systemctl status open-vm-tools
● open-vm-tools.service - Service for virtual machines hosted on VMware
     Loaded: loaded (/lib/systemd/system/open-vm-tools.service; enabled; vendor preset: enabled)
    Drop-In: /usr/lib/systemd/system/open-vm-tools.service.d
             └─desktop.conf
     Active: active (running) since Mon 2020-12-21 13:53:59 EST; 57min ago
       Docs: http://open-vm-tools.sourceforge.net/about.php
    Process: 496 ExecStartPre=/sbin/modprobe vmwgfx (code=exited, status=0/SUCCESS)
   Main PID: 498 (vmtoolsd)
      Tasks: 3 (limit: 2300)
     Memory: 12.1M
     CGroup: /system.slice/open-vm-tools.service
             └─498 /usr/bin/vmtoolsd
The output from the systemctl status open-vm-tools command shows that the service is loaded and running correctly.
Troubleshoot Kali Linux Install on VMware Workstation
There are a number of logs available for helping troubleshoot your Kali VMware install. These can all be found under the /var/log directory, and should be investigated if you are having any problems with VMtools or network configuration.
┌──(kali㉿kali)-[/var/log]
└─$ ll vmware*
-rw------- 1 root root  697 Nov 17 07:32 vmware-network.1.log
-rw------- 1 root root  697 Dec 21 13:53 vmware-network.log
-rw------- 1 root root 2424 Nov 17 09:49 vmware-vmsvc-root.1.log
-rw------- 1 root root 2418 Nov 17 09:07 vmware-vmsvc-root.2.log
-rw------- 1 root root 1754 Dec 21 13:53 vmware-vmsvc-root.log
-rw------- 1 root root  522 Dec 21 13:53 vmware-vmtoolsd-root.log
Final Thoughts
Hopefully this article on how to install Kali Linux on VMware has been useful. You have learned how to install Kali linux on VMware Workstation. Similar steps will work for VMware’s other desktop hypervisors such as VMware Fusion and VMware Player.
We have also taken a look at how to confirm VMtools is installed on Kali and is running correctly.
