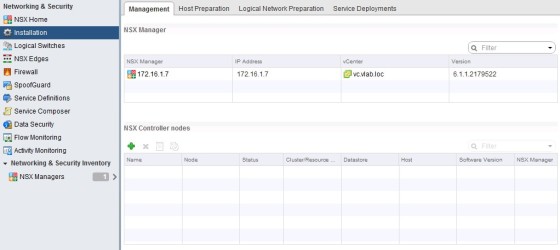
This post follows on from my recent post on deploying NSX Manager. Once NSX Manager has been deployed and configured, and connected to vCenter, the next step is to install the NSX Controllers (3 of them to be precise).
Deploying NSX Controllers
Browse to the ‘Installation’ pane within ‘Networking and Security’ in the vCenter Web Client:
To install the first controller node, click on the green ‘plus’ symbol under ‘NSX Controller Nodes’. You will then be prompted to configure the following details:
When you click ‘OK’ the controller will be deployed. When the task completes you should see a controller connected:
Preparing ESXi Hosts for NSX
Once the controllers have been deployed, the next step is to configure your hosts for NSX. To do so click the “Host Preparation” tab. You should see the clusters your vCenter manages listed:
As you can see, at the moment nothing is configured. To install the ESXi host kernel modules for NSX click ‘Install’. Once complete you should see an Installation Status as ‘Ready’, with the Firewall enabled:
The installation process will install 3 VIBs on each ESXi host. The VIBs are:
- esx-vxlan
- esx-vsip
- esx-dvfilter-switch-security
If you wish you can confirm the install on the host by checking the esxupdate.log file, and can list the VIBs installed on the host by running:
esxcli software vib list
The log file can be useful for troubleshooting the NSX host VIBs as well of course (I had an issue with one of the hosts in my test environment, which turned out to be DNS related, which was sign posted fairly clearly in the esxupdate log file)
Once installed, there will be a new service running on the ESXi hosts – netcpad. You can confirm this by running:
/var/log # /etc/init.d/netcpad status
netCP agent service is running
VXLAN Configuration
Once all your hosts have a ‘Ready’ status, click the Configure link in the VXLAN column to configure VXLAN for each cluster. For each cluster you configure you will be presented with the following options, most of which will be pre-populated:
There are a number of things to look out for when setting the options above. The VLAN is the VLAN that you will be used for the VXLAN traffic (this needs to be the same across all clusters). The MTU defaults to 1600 – This is to account for the VXLAN encapsulation of your traffic (note that in order to use an MTU of 1600, your physical switches need to be set up to handle Jumbo Frames). I have chosen to use an IP Pool to assign my hosts addresses on the VXLAN network , however DHCP can be used. Finally, the network teaming policy should match what is set on the dvSwitches.
Once VXLAN has been configured for each, you should see ‘Enabled’ in the VXLAN column for each of your clusters:
You should also see a new portgroup created on your dvSwitch in each cluster, with vmk interfaces for your hosts:
NSX Logical Network Preparation
The next step is to deal with the Logical Network Preparation:
Click on Segment ID. A segment ID is essentially the NSX equivalent of a VLAN. A logical network in NSX is assigned a Segment ID. Here we need to create the pool from which Segment IDs are assigned to logical networks:
After clicking ok you should see your settings listed:
NSX Transport Zones
In my lab I will be creating a transport zone that spans both of my clusters. In production it is likely that you will be more selective in the clusters you include in your transport zones, depending on your needs/network topology. I’ll go into transport zones in more detail in a later post, but for now will create a ‘global’ transport zone which involves all my clusters. This is done in the ‘Transport Zones’ pane, adding a new one by clicking on the green ‘plus’ symbol:
At the bottom of the screenshot, it shows that I have chosen to include both of my clusters in this transport zone. Click OK to create the zone.
That’s all for now, look out for further posts on VCP-NV objectives in the near future.


