The vSphere Management Assistant (vMA) is a virtual appliance which “allows administrators and developers to run scripts and agents to manage ESXi hosts and vCenter Server systems. vMA is a virtual machine that includes prepackaged software, a logging component, and an authentication component that supports non-interactive login.” You can read more about it here.
The VCAP-DCA blueprint has a number of objectives relating to the vMA, which I will attempt to cover here.
Installing the vSphere Management Assistant Appliance
The installation of the vMA is similar to the installation of any other virtual appliance. The steps are as follows:
- Once connected to vCenter using the vSphere client, click File then Deploy OVF Template
- Browse to the location where you downloaded the vMA files to an select the .ovf file, then click Open
- Click Next, then review the information displayed about the template/ovf, then click Next
- Accept the license agreement and then click Next
- Enter a name for the vMA then click Next
- Select the datastore where you wish to place the vMA and then click Next
- Over the next few screens, select the preferred disk format and the network options.
- Check the box Power on after deployment and then click Finish
The vMA will now deploy and boot up. There will be an initial ‘first time use’ wizard where you can set a password for the vi-admin account. Once that is complete the virtual machine’s console should look like this:
The first task, assuming you are happy with your network settings, is to set the timezone.
Configure vMA for Active Directory Authentication
You can configure vMA for Active Directory Authentication. This means that any ESXi hosts added to Active Directory can also be added to the vMA without the need to store the host’s credentials on the vMA. Before you attempt to add the vMA to AD you should ensure that your DNS settings on the appliance are correct (they should be the same DNS servers used by the domain)
The vMA uses a script called domainjoin-cli to add the vMA to AD. The setttings/help for the script are shown below:
usage: domainjoin-cli [options] command [args...]

where options are:

--help                                     Display this help information.
--help-internal                            Display help for debug commands
--log {.|path}                             Log to a file (or "." to log
to console).
--loglevel {error|warning|info|verbose}    Adjusts how much logging is
produced by domainjoin.
--nodcerpcd                                prevents dcerpcd from being
started, along with any daemons
that depend on it.

and commands are:

query
setname <computer name>
join [--notimesync] [--enable <module> --disable <module> ...] [--ou <organizationalUnit>] <domain name> <user name> [<password>]
join [--advanced] --preview [--ou <organizationalUnit>] <domain name>
join [--ou <organizationalUnit>] --details <module> <domain name>
leave [--enable <module> --disable <module> ...] [user name] [password]
leave [--advanced] --preview [user name] [password]
leave --details <module>

Example:

domainjoin-cli join likewisedemo.com Administrator
Once satisfied that name resolution is working as expected, add the vMA to AD by running the following command from the vMA console:
sudo domainjoin-cli join domainname domainuser
Following a reboot, you can check the vMA’s domain membership by running:
sudo domainjoin-cli query
vi-admin@vma:~> sudo domainjoin-cli query
vi-admin's password:
Name = vma
Domain = VMLAB.LOC
Distinguished Name = CN=VMA,CN=Computers,DC=vmlab,DC=loc
vi-admin@vma:~>
If you wish to have the vMA leave the domain, you can run:
sudo domainjoin-cli leave
The vi-user Account
Up to now we have been using the vi-admin account. There is another built in account on the vMA, the vi-user account. The vi-user account has limited privileges on the target ESXi hosts and cannot run any commands that require sudo execution. Following install, the vi-user account doesn’t have a password set. To set one, run:
sudo passwd vi-user
Adding Target Servers to the vMA
You can add a host to the vMA either using AD authentication or by using FastPass. To add a host using an AD account you can run the following command, whilst logged in as vi-admin:
vifp addserver vc1.mycomp.com –authpolicy adauth –username ADDOMAIN\\user1
Alternatively, to add a host using FastPass you can run the following:
vifp addserver vc2.mycomp.com –authpolicy fpauth
vi-admin@vma:~> vifp addserver esxi2.vmlab.loc --authpolicy fpauth
root@esxi2.vmlab.loc's password:
vi-admin@vma:~>
Once you have added your servers, you can confirm what has been added to the vMA by using the vifp listservers command:
vi-admin@vma:~> vifp listservers -l
esxi1.vmlab.loc ESXi    fpauth
esxi2.vmlab.loc ESXi    fpauth
vi-admin@vma:~>
We can check that it has worked by running the vifptarget command, then attempting to run a command on the host:
vi-admin@vma:~> vifptarget -s esxi1.vmlab.loc
vi-admin@vma:~[esxi1.vmlab.loc]> esxcli network firewall get
   Default Action: DROP
   Enabled: true
   Loaded: true
vi-admin@vma:~[esxi1.vmlab.loc]>
There are a few options when using vifptarget. Using the -c switch will clear the target:
vi-admin@vma:~[esxi1.vmlab.loc]> vifptarget --clear
If you have added a vCenter server you can use it to run a command against a host without the need to authenticate. For example:
If you wish to remove a server target from the vMA you can run the vifp removeserver servername command.
Generating Support Bundles
If you have problems with the vMA you can generate support log bundles by running the vma-support command:
vi-admin@vma:~> sudo vma-support
vi-admin's password:

VMware Linux Support Script 0.87

Preparing Files: \
Updating the vMA
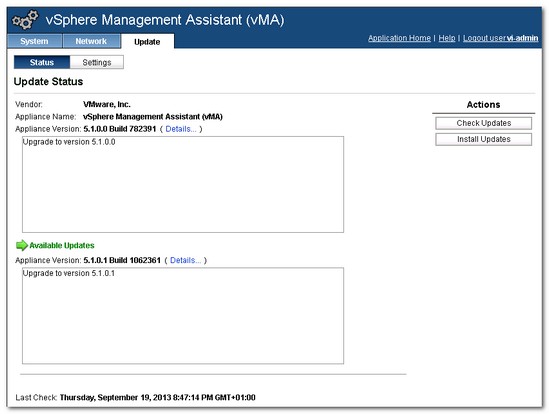
To update the vMA, start by logging into it’s web interface as the vi-admin account:
Click the Update tab, then check for updates:
If there is a valid update available you can click ‘Install Updates’ to begin the process:
Useful Links and Resources
vSphere Management Assistant Guide


