This post follows on from my recent posts on configuring highly available Platform Services Controllers. By the end of my previous post on this, I had deployed two platform services controllers, configured as a subordinate CA, and configured with the VMware HA scripts. The next step is to configure the external load balancer to provide load balancing for the PSCs. There are a number of compatible load balancers, detailed here. In my lab I have chosen to use Citrix Netscaler, the process for which is well documented by VMware, here.
Configuring Citrix NetScaler to Load Balance Platform Services Controller Traffic
In my lab I used the NetScaler VPX, virtual appliance. I’m not going to cover the deployment steps and initial NetScaler configuration in this article. If you’re new to NetScaler, there are a lot of great resources around including this series of posts. Once NetScaler has been deployed, log into the appliance via it’s management URL, using the default ‘nsroot’ account:
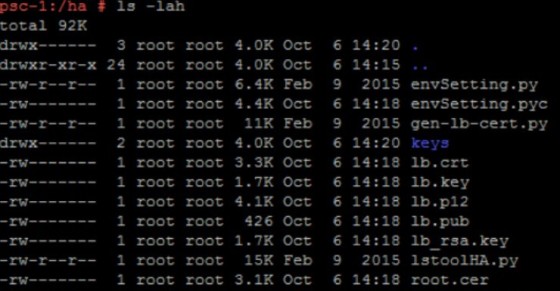
Once logged in, the first task is to configure the certificates. At this point you should have a /ha directory on the Platform Services Controllers. Grab the lb.crt, lb_rsa.key and root.cer files from there:
We need them to import into the NetScaler. To do so, go to Configuration > Traffic Management > SSL > Certificates, then click Install. Add the lb.crt and lb_rsa.key files then click Install:
The next step is to add the two platform services controllers to the netscaler, so that it will be able to send traffic to them. To do so, go to Configuration > Traffic Management > Load Balancing > Servers, and then add in the details for the first PSC:
Add the second PSC. Once done it should look something like this:
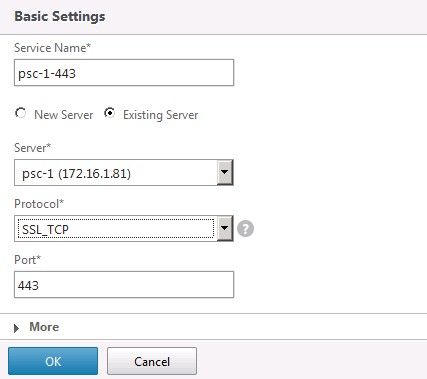
With the PSCs added, we now need to configure the services that NetScaler will load balance for the PSCs. Go to Configuration > Traffic Management > Load Balancing > Services and then click Add:
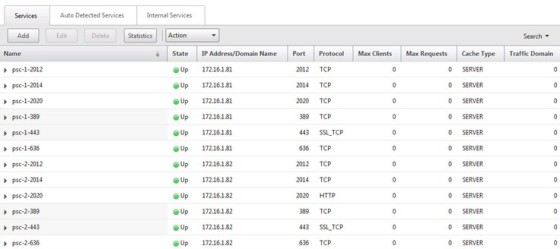
A service needs to be created for each of the following ports, 443 (SSL_TCP), 389, 636, 2012, 2014 and 2020 (TCP), and each one should be created for each PSC node. Once done, it should look like this:
With that done, we can bring these elements together by creating the virtual servers. These are the virtual IP addresses that you will be connecting to, which will load balance the traffic to the PSCs. Head over to Configuration > Traffic Management >Load Balancing >Virtual Servers and click Add:
At this point you should be prompted to enable load balancing:
With that done, you will see a new page displaying the settings of the new virtual server:
Next, click the “No Load Balancing Virtual Server Service Binding” link and add the two relevant services, ensuring the two added nodes are weighted differently:
Next, click the “No Server Certificate” link and bind the PSC certificate we added to the Netscaler earlier:
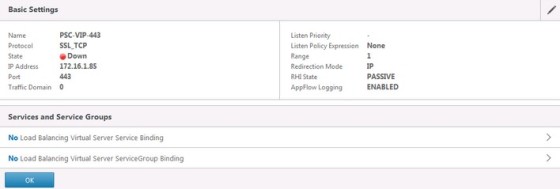
You’ve probably guessed, a virtual server needs to be created for each of the services, though port 443 is the only one that needs the certificate binding. Once done it should look like this:
Note the ‘Down’ status for my 443 virtual server. This is because I haven’t enabled SSL on the NetScaler:
The last step of the NetScaler configuration is to create persistency groups:
Make sure all the virtual servers are added, using SOURCEIP as the persistence method, and a time-out value of 1440. Once this is done, the Netscaler configuration should be complete. At this point we need to return to the Platform Service Controllers to complete the overall configuration. With the NetScaler now in place as the load balancer, we need to run the lstoolHA.py script on the PSC. This script can be found in the /HA directory. This command references the load balanced fqdn, configured on the NetScaler:
python lstoolHA.py --hostname=psc-1.vlab.local --lb-fqdn=psc.vlab.local --lb-cert-folder=/ha --user=administrator@vsphere.local --password=SSOPassword
Once the command has run through we can verify the changes it has made by running:
python lstoolHA.py --hostname=psc-1.vlab.local --lb-fqdn=psc.vlab.local --lb-cert-folder=/ha --user=administrator@vsphere.local --password=SSOPassword
In the output we should now see the load balanced FQDN as the URL for the PSC:

We should now have a highly available platform services controller. Should one node fail, the netscaler will continue to push traffic to the remaining node. I’ll come back to this in a future post looking at installing vCenter and connecting it to this PSC deployment.


