The Advanced package tool, commonly known as APT, is a application which allows for the management, installation and removal of software packages on Debian-based Linux distributions such as Ubuntu. Apt greatly simplifies the process of managing software applications on Debian Linux by automating the download and installation of software packages, from local or remote software repositories.
APT is not a single command, rather it is a collection of tools distributed as package, which includes tools such as apt, apt-cache and apt-get.
This is great for admins as it makes software management much easier – but what happens when it doesn’t work, and you get the “Apt Get – Command Not Found” message? This article looks at how you can troubleshoot the apt command.
Which Linux Distro Are You Using ?
If you receive a ‘command not found’ message when trying to run an apt command such as apt-get or apt-cache, the first thing to consider is the Linux distribution you are using. Apt is a software package management tool for Debian or Debian-based Linux systems such as Ubuntu, Linux Mint, Kali Linux and Parrot OS.
For RPM-based Linux distributions such as Red Hat, Fedora, CentOS and Amazon Linux, yum/dnf is generally the go to package manager.
If apt cannot be found, it could simply be because it is not intended for use on the version of Linux you are running. You can check which Linux distribution you are using, if you are in any doubt, by using the uname command:
$ uname -v
#23~20.04.1-Ubuntu SMP Mon Nov 15 14:03:19 UTC 2021
You can also get much a much more detailed view of the operating system are using by outputting the /etc/*-release file:
$ cat /etc/*-release
DISTRIB_ID=Ubuntu
DISTRIB_RELEASE=20.04
DISTRIB_CODENAME=focal
DISTRIB_DESCRIPTION="Ubuntu 20.04.3 LTS"
NAME="Ubuntu"
VERSION="20.04.3 LTS (Focal Fossa)"
ID=ubuntu
ID_LIKE=debian
PRETTY_NAME="Ubuntu 20.04.3 LTS"
VERSION_ID="20.04"
HOME_URL="https://www.ubuntu.com/"
SUPPORT_URL="https://help.ubuntu.com/"
BUG_REPORT_URL="https://bugs.launchpad.net/ubuntu/"
PRIVACY_POLICY_URL="https://www.ubuntu.com/legal/terms-and-policies/privacy-policy"
VERSION_CODENAME=focal
UBUNTU_CODENAME=focal
You can clearly see from the output this is an Ubuntu system.
How to Check if Apt is Installed
If you are using a Linux distro on which you expect Apt to be installed, but receive the apt-get : command not found when trying to run apt-get, for example, then the next step would be to check if apt exists on your system. A quick way to do this is to use the locate command, to see if we can find the apt-get binary:
$ locate apt-get
/snap/core/11420/usr/local/bin/apt-get
/snap/core/11420/usr/share/bash-completion/completions/apt-get
/snap/core/11420/usr/share/bash-completion/completions/slapt-get
/snap/core/11993/usr/local/bin/apt-get
/snap/core/11993/usr/share/bash-completion/completions/apt-get
/snap/core/11993/usr/share/bash-completion/completions/slapt-get
On a system where apt is available you should see an output similar to that shown above. If apt isn’t present then the locate command will not return any results. If that is the case then we will need to install it. One way to do this is to install it manually using a .deb file.
How to install / reinstall apt Using dpkg
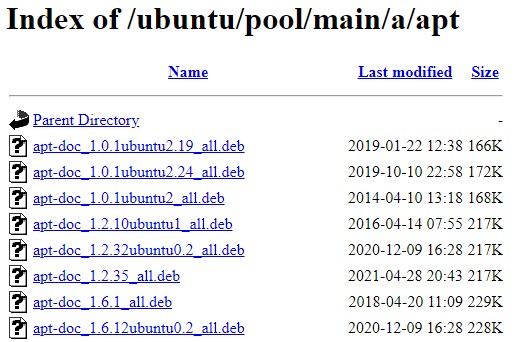
First of all we need to get the correct .deb package for the Linux system being used. For Ubuntu, we can use the following link, which takes us to one of the Ubuntu mirrors. You will see a bunch of files on this site, and need to select a apt version suitable for your system:

Select the one that is suitable with your architecture (amd64/i386). For example – apt_2.3.9_i386.deb . Once you have downloaded the file you can install it using dpkg:
sudo dpkg -i apt_2.3.9_i386.debOnce installed apt commands should now work as expected. You can confirm the version of apt you have by running:
$ apt --version
apt 2.0.6 (amd64)
Looks good!
Checking Apt Logs
Note that Apt has some log files that you can use to help you with troubleshooting. These can be found in /var/log/apt:
/var/log/apt$ ls -lah
total 116K
drwxr-xr-x  2 root root   4.0K Jan 17 10:15 .
drwxrwxr-x 14 root syslog 4.0K Jan 17 09:27 ..
-rw-r--r--  1 root root    54K Jan 17 10:15 eipp.log.xz
-rw-r--r--  1 root root   6.0K Jan 17 10:15 history.log
-rw-r--r--  1 root root    242 Jan 13 17:01 history.log.1.gz
-rw-r-----  1 root adm     32K Jan 17 10:15 term.log
-rw-r-----  1 root adm     429 Jan 13 17:01 term.log.1.gz
The term.log file contains details of changes apt has made to your system and recent activity:
/var/log/apt$ sudo tail term.log
Preparing to unpack .../firefox_96.0+build2-0ubuntu0.20.04.1_amd64.deb ...
Unpacking firefox (96.0+build2-0ubuntu0.20.04.1) over (95.0.1+build2-0ubuntu0.20.04.1) ...
Setting up firefox (96.0+build2-0ubuntu0.20.04.1) ...
Please restart all running instances of firefox, or you will experience problems.
Processing triggers for man-db (2.9.1-1) ...
Processing triggers for desktop-file-utils (0.24-1ubuntu3) ...
Processing triggers for mime-support (3.64ubuntu1) ...
Processing triggers for hicolor-icon-theme (0.17-2) ...
Processing triggers for gnome-menus (3.36.0-1ubuntu1) ...
Log ended: 2022-01-17  10:15:46
Summary
In this article you have learned how to fix the apt-get command not found error message. First we have seen how to confirm which distribution you are using, and whether apt is the correct package manager. We then went through how to install apt using dpgk, before checking the version.
