When you install ESXi 5 the firewall is enabled by default, with it only allowing the essential traffic, and denying the rest. You can manage the firewall using the vSphere client, or from the CLI.
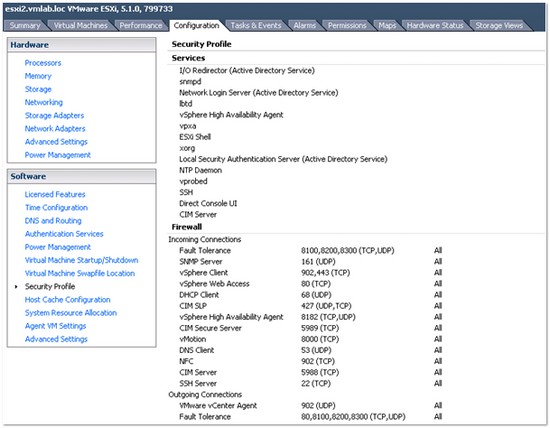
In the vSphere client the firewall settings can be accessed from the Security Profile section of the Configuration tab:
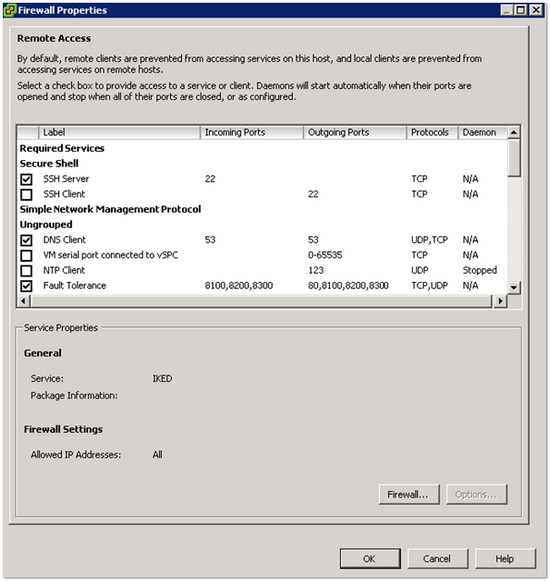
By accessing the firewall properties you can see which ports are open and which services are started:
Clicking the ‘Firewall’ button will allow you to allow connections only from specific IP addresses/ranges:
Service Automation
You can choose how to start services by clicking on the services properties:
Clicking options will allow you to change how the service starts:
You have the following options for starting services:
- Start automatically if any ports are open, and stop when all ports are closed
- Start and stop with host
- Start and stop manually (Select this to effectively disable the service)
Working with the Firewall using the GUI is fairly straight forward so, for the rest of this post I’ll focus on interacting with the ESXi firewall using the CLI.
Using ESXCLI to Configure the ESXi Firewall
With ESXi 5 the esxcfg-firewall command has been replaced by the esxcli network firewall command/namespace. You can list the current status of the firewall by running:
esxcli network firewall get
To enable and disable the firewall service we can use the following commands:
esxcli network firewall set –enabled false
esxcli network firewall set –enabled true
To list the current firewall rules you can run:
esxcli network firewall rulesset list
We can enable a rule by running
esxcli network firewall ruleset –enabled true –ruleset-id rulesetName
For example:
We can confirm by running the ESXCLI network firewall rulesset list command again:
To disable a rule:
esxcli network firewall ruleset –enabled false –ruleset-id rulesetName
In addition you can restrict which IP addresses/ranges are allowed to access a particular service/port:
The following commands can be used to work with these rules:
esxcli network firewall ruleset allowedip add –ruleset-id RulesetName –ip-address IPAddress/Network
esxcli network firewall ruleset allowedip add –ruleset-id RulesetName –ip-address IPAddress
esxcli network firewall ruleset allowedip remove –ruleset-id RulesetName –ip-address IPAddress/Network
esxcli network firewall ruleset allowedip remove –ruleset-id RulesetName –ip-address IPAddress
esxcli network firewall ruleset allowedip list –ruleset-id RulesetName
For example, to allow the SNMP service to talk to 10.10.10.1 we could run the following command:
Actually, we got an error. This is because the ruleset is set to allow connections from all. To change this we can run:
We can verify the settings by running:
esxcli network firewall ruleset allowedip list
We can also jump back to the vsphere client to see the changes there:
Viewing Existing Services and Creating Custom Services
You can view/change the existing service configuration by editing the /etc/vmware/firewall/services.xml file:
If you make any changes to the firewall you should refresh the firewall:
esxcli network firewall refresh
Creating Custom Services Walkthrough
As discussed above, we can see what a firewall rule looks like by examining one of the xml files in /etc/vmware/firewall. For example, this is what the contents of the fdm.xml file looks like:
<!-- Firewall configuration information for FDM -->
<ConfigRoot>
<service>
<id>fdm</id>
<rule id='0000'>
<direction>inbound</direction>
<protocol>tcp</protocol>
<porttype>dst</porttype>
<port>8182</port>
</rule>
<rule id='0001'>
<direction>outbound</direction>
<protocol>tcp</protocol>
<porttype>dst</porttype>
<port>8182</port>
</rule>
<rule id='0002'>
<direction>inbound</direction>
<protocol>udp</protocol>
<porttype>dst</porttype>
<port>8182</port>
</rule>
<rule id='0003'>
<direction>outbound</direction>
<protocol>udp</protocol>
<porttype>dst</porttype>
<port>8182</port>
</rule>
<enabled>false</enabled>
<required>false</required>
</service>
</ConfigRoot>
As you can see from the output above, the configuration file shows all the various parameters of the service, such as the ports it uses and the direction of the traffic. We’ll use the text from this file to create a new service called MyTestService. We’ll start by copying the fdm.xml file:
cp fdm.xml mytestservice.xml
We can then edit mytestservice.xml to specify the details of our custom service. Once complete, we will need to refresh our firewall service by running:
esxcli network firewall refresh
Then we can check our firewall rules by running:
esxcli network firewall ruleset list
Which will give the following output:
You can see my new service is listed and enabled.
We can also verify that the individual rulesets for our new firewall rule/service by running the following command:
esxcli network firewall ruleset rule list | grep mytestservice
You can also see the new service in the vSphere Client:
One thing to bear in mind is that these changes are not persistent and will be lost when the host is rebooted. This article describes a way to make the changes permanent – https://www.virtuallyghetto.com/2012/09/creating-custom-vibs-for-esxi-50-51.html.
Firewall Service Levels
With the ESXi firewall, there is the concept of firewall service levels. These are defined as follows:
- High Security (Default) – The ESXi Firewall is configured to block all incoming and outgoing traffic, except for ports 22,123,427,443,902,5989, and 5988. When in use a ‘esxcli network firewall get‘ output looks like this:
~ # esxcli network firewall getDefault Action: DROPEnabled: trueLoaded: true - Medium Security – All incoming traffic is blocked, except on the default ports and any ports you specifically open. Outgoing traffic is not blocked. This mode can be configured by running the following command:
esxcli network firewall set -d true. Running esxcli network firewall get now will show the following:
~ # esxcli network firewall getDefault Action: PASSEnabled: trueLoaded: true
- Low Security – There are no ports blocked on either incoming or outgoing traffic. This is achieved by turning the firewall off:
~ # esxcli network firewall set -e false~ # esxcli network firewall getDefault Action: DROPEnabled: falseLoaded: true
List of ESXCLI Network Firewall Commands
Useful Links and Resources
Creating custom firewall rules


