I use Azure Automation Accounts a lot to help automate tasks within my Azure environments, so find myself creating Azure Automation accounts and supporting resources such as Log Analytics workspaces fairly often. As a repeatable task, this itself was a great candidate for automation. In this article I will show how you can deploy an Azure Automation account using an ARM template.
What is an ARM Template?
In a nutshell, an ARM template is a JavaScript Object Notation (JSON) file, in which you can define Azure resources and configuration. You can submit the template to Azure, and the resources defined in it will be deployed. If you’re new to ARM templates, check out the documentation here.
Azure Automation Account Template
My ARM template will create a new Azure Automation account in the chosen region, along with a new Log Analytics workspace, which will then be linked to the new Automation Account. First of all, I’ll break down each section of the template, then show the finished template towards the end of the article.
The first section details the parameters we will need for the rest of the template. These include, the automation account and log analytics workspace names and location, the log analytics workspace SKU (set to per GB by default) and data retention (set to 30 days). Note that the template doesn’t create a new resource group, this will need to exist before deployment.
{
  "$schema": "https://schema.management.azure.com/schemas/2019-04-01/deploymentTemplate.json#",
  "contentVersion": "1.0.0.0",
  "parameters": {
    "workspaceName": {
      "type": "string",
      "metadata": {
        "description": "Log Analytics Workspace name"
      }
    },
    "sku": {
      "type": "string",
      "defaultValue": "pergb2018",
      "metadata": {
        "description": "Set Log Analytics Pricing Tier"
      }
    },
    "dataRetention": {
      "type": "int",
      "defaultValue": 30,
      "metadata": {
        "description": "Log Analytics Data Retention"
      }
    },
    "location": {
      "type": "string",
      "defaultValue": "[resourceGroup().location]",
      "metadata": {
        "description": "Location in which to create the log analytics workspace."
      }
    },
    "automationAccountName": {
      "type": "string",
      "metadata": {
        "description": "Automation account name"
      }
    },
    "automationAccountLocation": {
      "type": "string",
      "defaultValue": "[resourceGroup().location]",
      "metadata": {
        "description": "location in which to create the Automation account."
      }
    }
  },
The next section details the resources the template will create. First of all there is the Log Analytics Workspace – here we reference some of the parameters mentioned to set the name, SKU and the data retention.
    {
      "type": "Microsoft.OperationalInsights/workspaces",
      "apiVersion": "2020-08-01",
      "name": "[parameters('workspaceName')]",
      "location": "[parameters('location')]",
      "properties": {
        "sku": {
          "name": "[parameters('sku')]"
        },
        "retentionInDays": "[parameters('dataRetention')]",
        "features": {
          "searchVersion": 1,
          "legacy": 0
        }
      }
    }
Next, the Automation Account is defined:
{
      "type": "Microsoft.Automation/automationAccounts",
      "apiVersion": "2020-01-13-preview",
      "name": "[parameters('automationAccountName')]",
      "location": "[parameters('automationAccountLocation')]",
      "dependsOn": [
        "[parameters('workspaceName')]"
      ],
      "properties": {
        "sku": {
          "name": "Basic"
        }
      }
    },
Note that we have a dependency on the Log Analytics Workspace being successfully created. The SKU for the automation account is set to Basic.
Finally, we create the link between the Automation Account and the Log Analytics Workspace. This is needed to support some of the features of the Automation Account such as Update Management.
{
      "type": "Microsoft.OperationalInsights/workspaces/linkedServices",
      "apiVersion": "2020-08-01",
      "name": "[concat(parameters('workspaceName'), '/' , 'Automation')]",
      "location": "[parameters('location')]",
      "dependsOn": [
        "[parameters('workspaceName')]",
        "[parameters('automationAccountName')]"
      ],
      "properties": {
        "resourceId": "[resourceId('Microsoft.Automation/automationAccounts', parameters('automationAccountName'))]"
      }
    }
And that’s it, only a few resources required to get up and running with an Azure Automation Account. This is the completed template:
{
  "$schema": "https://schema.management.azure.com/schemas/2019-04-01/deploymentTemplate.json#",
  "contentVersion": "1.0.0.0",
  "parameters": {
    "workspaceName": {
      "type": "string",
      "metadata": {
        "description": "Log Analytics Workspace name"
      }
    },
    "sku": {
      "type": "string",
      "defaultValue": "pergb2018",
      "metadata": {
        "description": "Set Log Analytics Pricing Tier"
      }
    },
    "dataRetention": {
      "type": "int",
      "defaultValue": 30,
      "minValue": 7,
      "maxValue": 730,
      "metadata": {
        "description": "Log Analytics Data Retention"
      }
    },
    "location": {
      "type": "string",
      "defaultValue": "[resourceGroup().location]",
      "metadata": {
        "description": "Location in which to create the log analytics workspace."
      }
    },
    "automationAccountName": {
      "type": "string",
      "metadata": {
        "description": "Automation account name"
      }
    },
    "automationAccountLocation": {
      "type": "string",
      "defaultValue": "[resourceGroup().location]",
      "metadata": {
        "description": "location in which to create the Automation account."
      }
    }
  },
  "resources": [
    {
      "type": "Microsoft.OperationalInsights/workspaces",
      "apiVersion": "2020-08-01",
      "name": "[parameters('workspaceName')]",
      "location": "[parameters('location')]",
      "properties": {
        "sku": {
          "name": "[parameters('sku')]"
        },
        "retentionInDays": "[parameters('dataRetention')]",
        "features": {
          "searchVersion": 1,
          "legacy": 0
        }
      }
    },
    {
      "type": "Microsoft.Automation/automationAccounts",
      "apiVersion": "2020-01-13-preview",
      "name": "[parameters('automationAccountName')]",
      "location": "[parameters('automationAccountLocation')]",
      "dependsOn": [
        "[parameters('workspaceName')]"
      ],
      "properties": {
        "sku": {
          "name": "Basic"
        }
      }
    },
    {
      "type": "Microsoft.OperationalInsights/workspaces/linkedServices",
      "apiVersion": "2020-08-01",
      "name": "[concat(parameters('workspaceName'), '/' , 'Automation')]",
      "location": "[parameters('location')]",
      "dependsOn": [
        "[parameters('workspaceName')]",
        "[parameters('automationAccountName')]"
      ],
      "properties": {
        "resourceId": "[resourceId('Microsoft.Automation/automationAccounts', parameters('automationAccountName'))]"
      }
    }
  ]
}
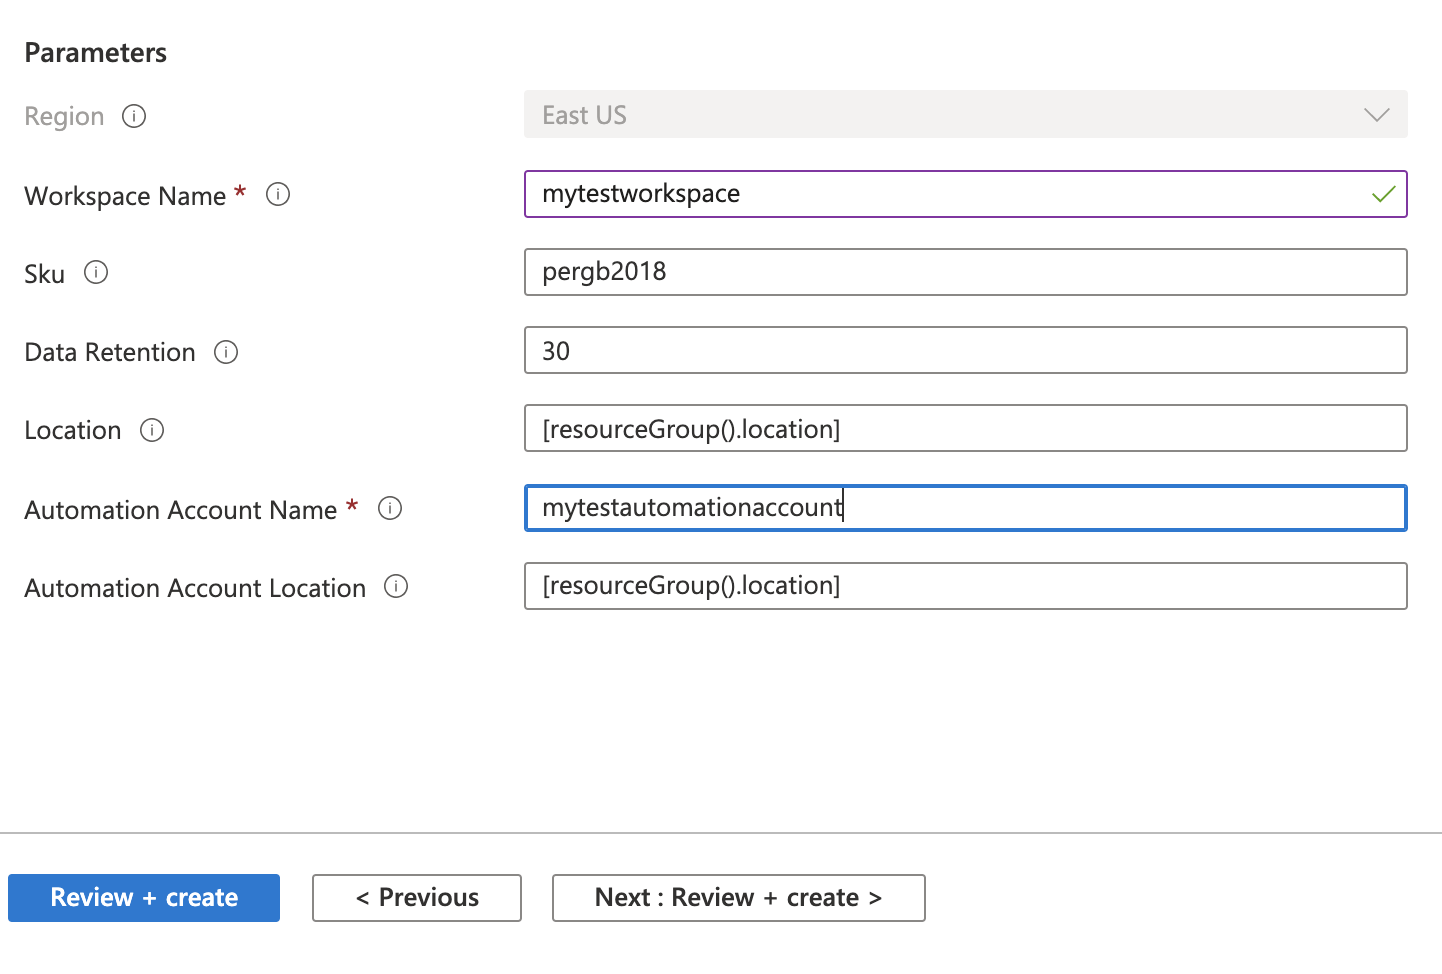
This can now be deployed using the Azure Portal or via your preferred method. To do so using the portal you can log in, then search for deploy a custom template. Here you will be able to paste in the template, then fill in the parameters:

Click Review+Create and then on the next page, review, then click create. You can then monitor the deployment. It doesn’t take too long to deploy – once complete you should see the following:

And that’s it – Azure Automation Account and linked Log Analytics workspace deployed using an ARM template in a few seconds! Certainly easier than clicking in the Azure Portal!