I recently had a need to clone my nested lab environment, so I could do some testing without breaking my lab and so I wanted to have a look at how to clone VCSA successfully. I had some issues with the cloned VCSAs networking, so posting what I worked through here.
When starting the cloned VCSA, the progress bar halted around three quarters of the way along. I hit ALT-F1 to see what was happening and saw that a bunch of services were failing to start and there were issues with eth0:

The log confirmed this, showing that eth1 had no configuration:

This issue occurs because the VCSA references the MAC address of the vNIC associated with eth0. When the VCSA is cloned, a new MAC address is assigned to the clone – the VCSA then sees this as a new NIC with no configuration, whilst it sees the original NIC as missing. To get the cloned VCSA to boot we need to remove the reference to the old MAC address. As my VCSA wouldnt boot, I restarted, but interupted the boot at the GRUB menu, so that I could boot into a single user mode:

The kernel option needs to be modified in the GRUB bootloader, in order to boot into a shell. This is protected by a password. Press ‘P’ then enter the credentials. This will either be the default password (vmware), or if the root password has been reset since deployment then it will be whatever that password is set as. Once the correct password is entered, the option to edit the menu items will be available. The line that needs to be edited is the one beginning ‘SUSE Linux…’, shown highlighted in the above screenshot. Press ‘e’ to edit the line, then append ‘init=/bin/bash’ to the end of the kernel options:

Once done, press enter, then press ‘b’ to boot with the new kernel options. The appliance should then boot to a shell:

Now the configuration referencing the old MAC address can be removed. To do so, the following file needs to be edited:
vi /etc/udev/rules.d/70-persistent-net.rules

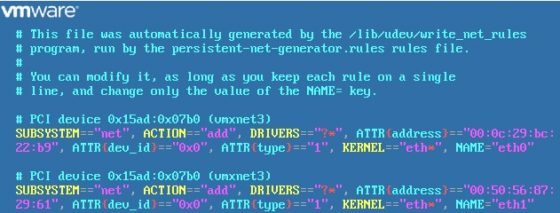
The file will look something like this:
Remove the configuration, so that the file looks like this:

Save the changes to the file, then reboot the appliance. It should now boot with networking, using the same network configuration as the source VCSA it was cloned from. That’s how to clone VCSA! Very handy in a nested lab!