By default, the default iSCSI configuration creates only one path to each iSCSI target. Port binding is used to provide multiple paths to an iSCSI array. With vSphere 5, iSCSI port binding can be configured in the vSphere client as well as the CLI. Prior to ESXi 5, port binding could only be configured using the CLI. There are a few things to bear in mind before configuring port binding:
- The array’s target ports must reside in the same layer 2 segment/IP subnet as the vmkernel interfaces that will connect to it.
- All VMkernel ports used for iSCSI must reside in the same layer 2 segment / IP subnet.
- All VMkernel ports used for iSCSI must be on the same vSwitch.
- Network routing is not supported. Enabling multipathing removes the ability to route to the iSCSI target.
iSCSI Network Configuration
The first step to configuring software iSCSI is to set up the appropriate network configuration:
- In the Configuration | Networking screen in the vSphere client, click Add Networking
- Select VMkernel and click Next
- Select Create a vSphere Standard Switch
- Select the adapters you wish to use for iSCSi traffic and click next. You will need at least two adapters.
- Label the Portgroup appropriately. Click Next.
- Configure an IP address for the VMkernel portgroup. This needs to be in the same IP subnet as the iSCSI targets, as discussed above. Click Next.
- Review the summary screen, then click Finish to create the new vSwitch.
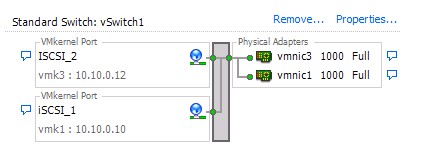
The next step is to go into the settings of the new vSwitch and create additional portgroups for each nic you have assigned to the vSwitch. In my lab I used two nics so created two portgroups. My resulting configuration looked like this:
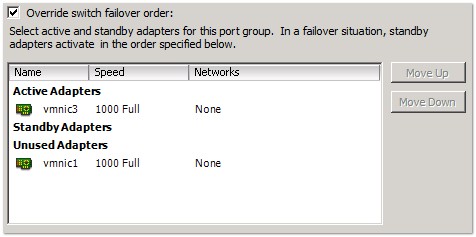
By default, all network adapters that were added to the vSwitch will be active for all portgroups:
What we need to do is only have one adapter active for each portgroup, with the others being configured as unused:
For my other portgroup I set vmnic1 as the Active Adapter, with vmnic3 being set as Unused.
iSCSI Network Configuration Using the ESXCLI
You can also complete the configuration steps above using esxcli. To create a new standard vSwitch run:
esxcli network vswitch standard add -v vSwitch1
Once the switch is created we can create the new portgroups:
~ # esxcli network vswitch standard portgroup add -p ISCSI_1 -v vSwitch1
~ # esxcli network vswitch standard portgroup add -p ISCSI_2 -v vSwitch1
Next we need to add the uplinks to the new vSwitch:
~ # esxcli network vswitch standard uplink add -u vmnic1 -v vSwitch1
~ # esxcli network vswitch standard uplink add -u vmnic3 -v vSwitch1
Then make them active:
# esxcli network vswitch standard policy failover set -a vmnic1,vmnic3 -v vSwitch1
The next step is to associate the uplinks/nics with the correct portgroups:
~ # esxcli network vswitch standard portgroup policy failover set -a vmnic1 -p ISCSI_1
~ # esxcli network vswitch standard portgroup policy failover set -a vmnic3 -p ISCSI_2
The last step is to create the VMkernel interfaces and association them with the portgroups we have just created:
~ # esxcli network ip interface add -p ISCSI_1 -i vmk1
~ # esxcli network ip interface add -p ISCSI_2 -i vmk3
~ # esxcli network ip interface ipv4 set -i vmk1 -I 10.10.0.10 -N 255.255.255.0 -t static
~ # esxcli network ip interface ipv4 set -i vmk3 -I 10.10.0.12 -N 255.255.255.0 -t static
Once that is done the network configuration will be complete and will match that shown in the vSphere client in the first example.
Configure the iSCSI Software Adapter
Before you are able to configure the adapter, it will need to be enabled. In the vSphere client, go to Configuration | Storage Adapters. Click Add, and select the iSCSI Storage Adapter:
If you prefer you can enable the adapter using esxcli by running:
~ # esxcli iscsi software set -e true
Software iSCSI Enabled
Once enabled you can access the adaptors properties and change the initiator name if you choose to do so:
The next step is to configure IP addresses of the iSCSI targets, either using Static or Dynamic discovery and CHAP authentication if required:
You can also change the name and define the targets using esxcli:
esxcli iscsi adapter set --name iqn.1998-01.com.vmware:esx-host01-64ceae7s -A vmhba33
esxcli iscsi adapter discovery sendtarget add -a 10.10.10.1:3260 -A vmhba33
Configuring Multipathing for Software iSCSI
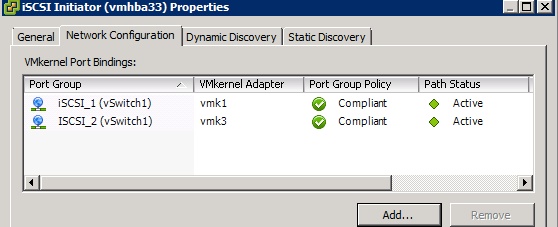
The port binding is set up under the Network Configuration options in the software iSCSI adapter’s properties:
Once all the required portgroups have been added, click ok then perform a rescan of the adapter.
If you already had a session open to the iSCSI target prior to configuring port binding it may be necessary to perform a iSCSI re-login. You can list the existing iSCSI sessions using the cli:
/dev/disks # esxcli iscsi session list --adapter vmhba33
vmhba33,iqn.1992-05.com.emc:bb000c2965b5ae0000-1,00023d000001
   Adapter: vmhba33
   Target: iqn.1992-05.com.emc:bb000c2965b5ae0000-1
   ISID: 00023d000001
   TargetPortalGroupTag: 1
   AuthenticationMethod: none
   DataPduInOrder: true
   DataSequenceInOrder: true
   DefaultTime2Retain: 0
   DefaultTime2Wait: 2
   ErrorRecoveryLevel: 0
   FirstBurstLength: 262144
   ImmediateData: true
   InitialR2T: false
   MaxBurstLength: 262144
   MaxConnections: 1
   MaxOutstandingR2T: 1
   TSIH: 2
To log out of the sessions run:
esxcli iscsi session remove --adapter vmhba33
And to enable sessions with the new configuration:
esxcli iscsi session add --adapter vmhba33
You can also configure the port binding using esxcli. To add the portgroups run:
esxcli iscsi networkportal add --nic vmk1 --adapter vmhba33
esxcli iscsi networkportal add --nic vmk3 --adapter vmhba33
You can check that multipathing is working, either using the vSphere client, or by using the CLI:
# esxcli storage core path list
Configuring Round Robin
To load balance across paths you can configure the round robin multipath policy. This can be done in the ‘Manage Paths’ screen in the vSphere client, or by using esxcli:
esxcli storage nmp satp set -s SATP_NAME -P VMW_PSP_RR
esxcli storage nmp device list -d naa.600601602xxxxxxxxxxxxxxxx


