I recently had to configure vNet peering between two vNets in the same Azure subscription, so I decided to do an article on the process. First of all, what is vNet peering?
VNet peering is a mechanism that connects two virtual networks (VNets) in the same region through the Azure backbone network. Once peered, the two virtual networks appear as one for all connectivity purposes.
So, essentially it’s a way of linking two virtual networks, to allow VMs on each to communicate with each other. Note that Global vNet peering is also now available, which allows you to peer vNets that exist in different regions. A key point to be aware of is that the IP address spaces used in each vNet to be peered must not overlap.
For this article, I’ve created two vNets, each with a single subnet, with the following IP name spaces.
- Name: vnet1, IP Address Space:10.1.0.0/16
- Name: vnet2, IP Address Space: 10.2.0.0/16
Configure Peering Using Azure Portal
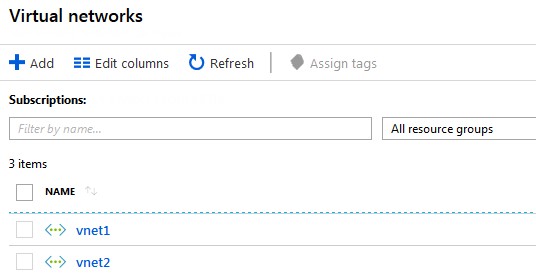
First, navigate to the virtual networks page in the Azure portal. Here you will see a list of the vNets that have been created:

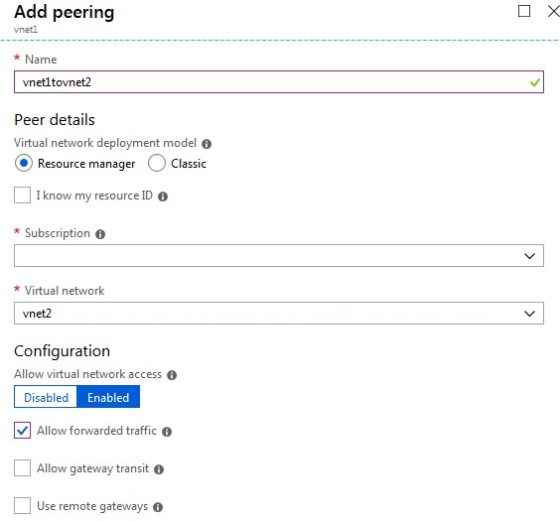
Next, click the first vNet for the peering – in this example, vnet1. Click Peerings and then click Add. On the Add Peering page enter a name for the peering, and select the Virtual Network to create the peer with, in this case vnet2:

Under the configuration section I have chosen to allow forwarded traffic. This allows the vnet to receive peers forwarded traffic (which is traffic that didn’t originate from the peer).
Allow gateway transit allows the peered vNet to use the virtual network gateway in this vNet. If this is to work, the ‘Use remote gateways’ option must be set on the peer.
Once done, review the selected options, then click OK. You will then be able to review the peering status:

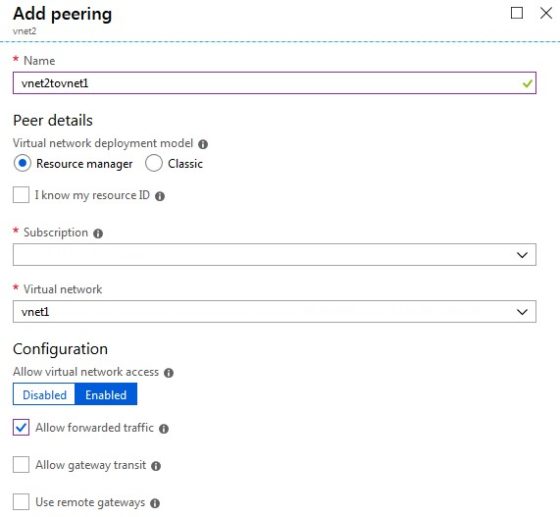
With that done, we need to repeat the process, but using vnet2, to complete the other half of the peering. Navigate back to the Virtual Networks page, and this time, click on the vnet2 object, then click peerings. Click add to open the Add Peering page:

This time, vnet1 has been used as the Virtual Network to peer with. Once again, review the configuration, then click OK. Now we should see that the peering status is ‘connected’:

And that’s it done! Virtual machines in the two separate vNets should now be able to communicate, providing NSGs are configured appropriately.
Configuring vNet Peering using Powershell
As you can see, it doesn’t take a long time to configure peering between two vNets using Azure Portal. However, you can accomplish the task even quicker by using PowerShell. To do so, we can use the following code. Set the variables appropriately, using the correct vNet and Resource Group names.
$vnet1name = 'vnet1'
$vnet2name = 'vnet2'
$vnet1RG = 'RG-01'
$vnet2RG = 'RG-02'
$vnet1 = Get-AzureRmVirtualNetwork -Name $vnet1name -ResourceGroupName $vnet1RG
$vnet2 = Get-AzureRmVirtualNetwork -Name $vnet2name -ResourceGroupName $vnet2RG

Add-AzureRmVirtualNetworkPeering -Name $vnet1Name'-'$vnet2Name -VirtualNetwork $vnet1 -RemoteVirtualNetworkId $vnet2.Id
Add-AzureRmVirtualNetworkPeering -Name $vnet2Name'-'$vnet1Name -VirtualNetwork $vnet2 -RemoteVirtualNetworkId $vnet1.Id